> ## Documentation Index
> Fetch the complete documentation index at: https://docs.fintoc.com/llms.txt
> Use this file to discover all available pages before exploring further.
# Integration flow
> Learn how to use Fintoc's Direct Debit API
There are two stages in the Direct Debit product:
1. Your user must first authorize Fintoc to debit his account. We call this authorization a **Subscription**.
2. Once the user authorize Fintoc, you can create charges to debit your user's account.
The following diagram shows how Fintoc interacts with both your backend and your frontend on both stages.
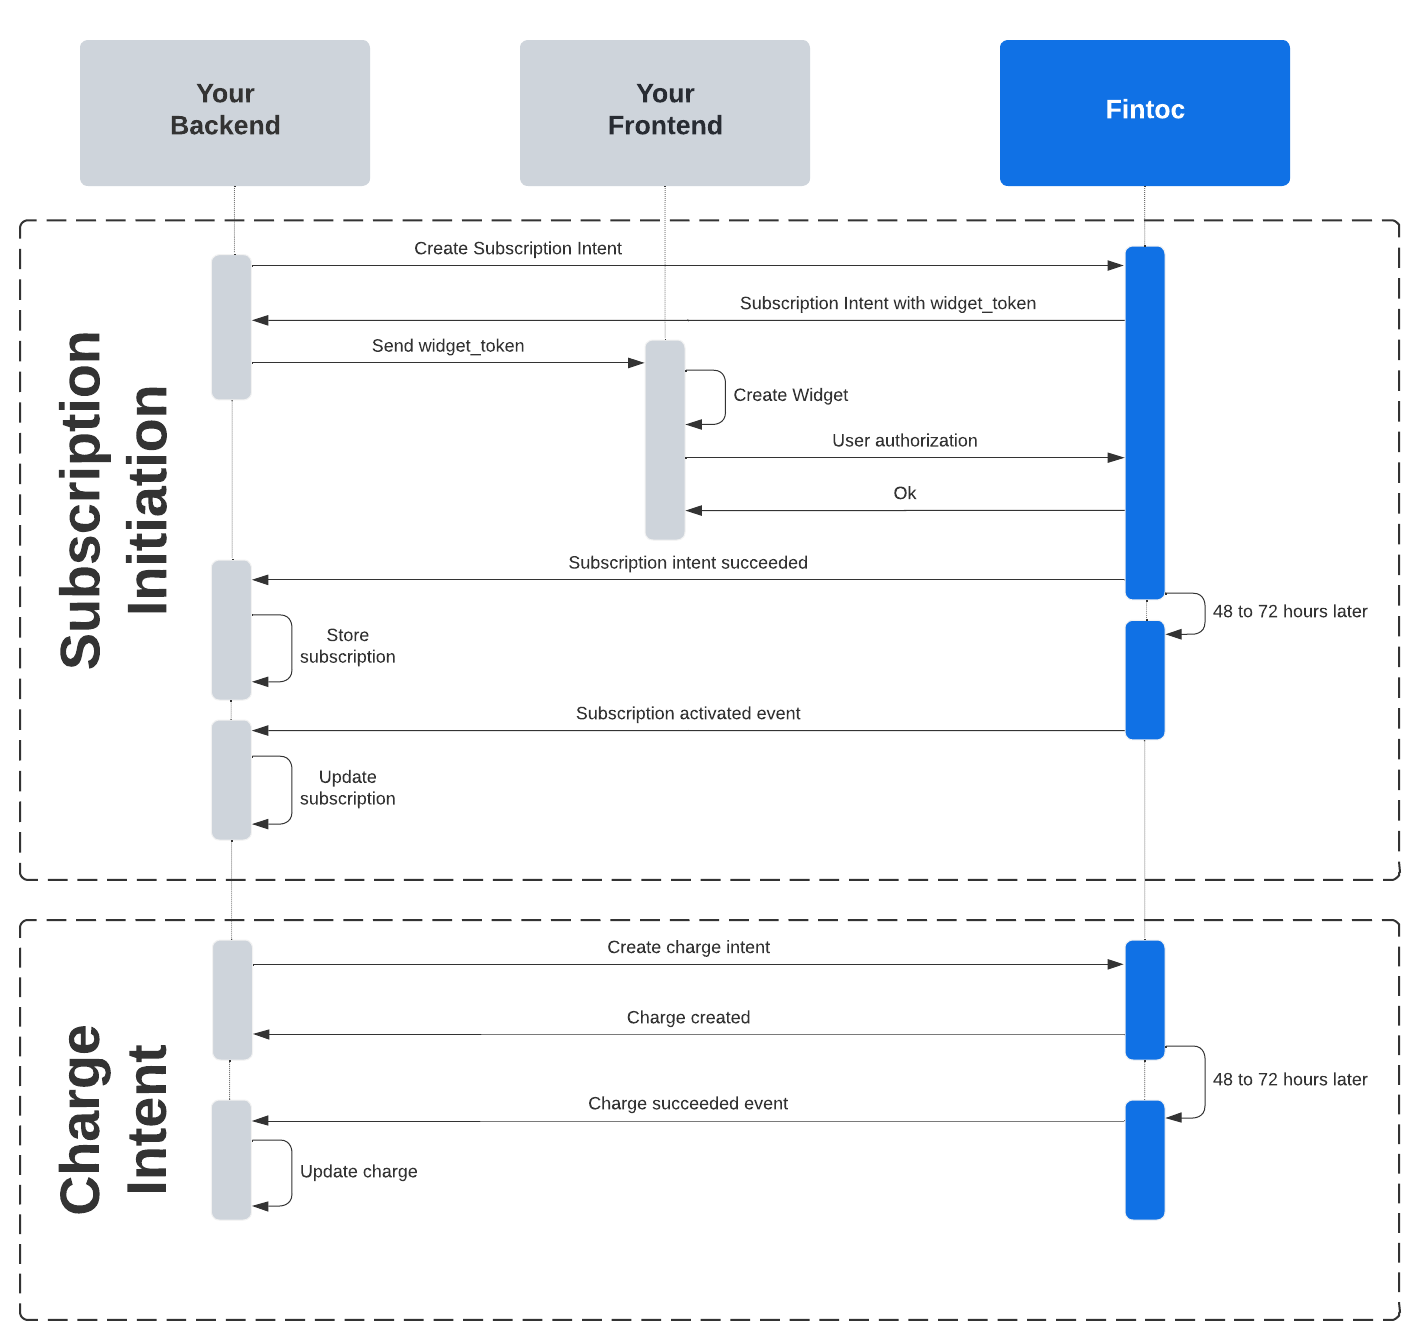 # Authorization flow
Before you can start creating charges, your user must authorize Fintoc to debit their account. This authorization is what we call a **Subscription**. As in most of Fintoc's products, your user must go through the Widget in order to create the subscription.
There are three steps to create subscriptions using Fintoc:
1. On your backend, create a `SubscriptionIntent` using your **[Secret Key](/v2023-11-15/docs/home/api-keys)**
2. Open the widget on your frontend using your **[Public Key](/v2023-11-15/docs/home/api-keys)**
3. Handle post-subscription events
## Create a Subscription Intent
To start the subscription process you must first create a Subscription Intent from your backend.
```curl theme={null}
curl --request POST "https://api.fintoc.com/v1/subscription_intents" \
--header 'Authorization: sk_live_0000000000000000' \
--header 'Content-Type: application/json'
```
The response should look like this:
```json theme={null}
{
"id": "si_m7N9rAWJS9dWDKEe",
"object": "subscription_intent",
"widget_token": "si_XXXXXXXX_sec_YYYYYYYY",
"status": "created",
"bank_account": null,
"subscription": null,
"business_profile": {
"name": "Merchant Name"
},
"created_at": "2021-11-11T02:29:16Z"
}
```
Notice that the Subscription Intent includes a `widget_token`. This token is necessary in order to open the Widget in your applications' frontend. The next section contains more details about this.
**Business Profile Name**
You can send the `business_profile.name` to customize the name to be shown as the "Recipient Company" on the widget screens.
## Open the widget for Subscriptions
Once the Subscription Intent is created, you must send its `widget_token` to your frontend and use it to configure the widget and the workflow that the user will follow.
**Widget Token**
The `widget_token` prevents your application from having to send sensitive data to Fintoc from your frontend. The token is temporary and will expire 10 minutes after its creation.
Here's an example of the widget configured with the `widget_token`:
```html theme={null}
Fintoc Demo
```
**Use the Widget callbacks and events correctly**
**Never** use the `onSuccess`, `onExit` or `onEvent` callbacks to get the state of the Subscription being created. You should **only** use these callbacks to handle the flow of your frontend application, **while waiting backend confirmation** via Webhooks. Frontend events can also be used to generate metrics about general widget usage, but you should **never** rely solely on them to assume a Subscription was created or failed to be created.
To read more about the widget and its configuration, head over to the [widget](/v2023-11-15/docs/resources/widget) section.
## Handle post-subscription events
Once a Subscription Intent finishes, you handle the subscription result in your frontend and complete the subscription in your backend. For your frontend you will use the widget callback, and for your backend you will use the events sent by webhooks.
### Handle the subscription result on your frontend
Once a Subscription Intent finishes successfully, the widget executes the `onSuccess` callback. You need to pass this function to the widget upon creation.
With this callback, you can decide what to do with your user's frontend once the subscription is complete, for example:
* Redirect the user to a post-subscription view
* Show the user a success screen.
#### Handle errors
You don't only need to handle the succeeded case because subscriptions can also fail. For example, your customer left the process before completing the subscription.
When a subscription fails or is rejected by your customer, the widget executes the `onExit` callback. With this callback, you can handle errors on your frontend. For example, you can invite your customer to use retry the process.
To obtain the reason of the error you can access the `onExit` callback creating an instance of it. Here's an example:
```javascript theme={null}
onExit: function onExit(errorReason) {
console.log(errorReason);
}
```
### Store the created subscription
To receive notifications about the subscription process, you must first have created a Webhook Endpoint using Fintoc and assign to it the events that you want to receive.
It is **very important** that you subscribe to the `subscription_intent.succeeded` event. Also you must store the included `subscription_id` in a safe place you can access later. The `subscription_id` is needed in order to create **Charges** later on.
The subscription process may generate 3 different events that are sent to your webhook endpoint:
| Event | Description |
| :------------------------------ | :---------------------------------------------------------------------------------------------------------------------------------------------------------- |
| `subscription_intent.succeeded` | Event that triggers when a subscription intent is validated as successful. The `subscription_intent` includes the resulting `subscription` object. |
| `subscription_intent.failed` | Event that triggers when a subscription intent fails due to a problem with the bank or Fintoc. |
| `subscription_intent.rejected` | Event that triggers when a subscription intent is rejected by the user. This may happen when the user rejects the MFA step or if it is entered incorrectly. |
**Backend's webhook vs widget's onSuccess**
It is **very important** for you to wait for the webhook event on your backend to finish the process. You should **never** finish the flow solely based on the `onSuccess` function from the widget. Some users may close the widget before the callback to send the webhook to your backend gets executed.
### Wait for subscription activation
The created subscription starts with a `pending` status. This indicates that the subscription was created correctly but charges can not be created yet. First, Fintoc needs the bank to confirm that the subscription is operational.
A new subscription can take up to 5 business days for it to be operational. Once a subscription is validated as ready to receive charges, a `subscription.activated` event is triggered and sent via webhooks.
If for any reason the bank informs Fintoc that a subscription has been canceled, a `subscription.canceled` event will be triggered
| Event | Description |
| :----------------------- | :------------------------------------------------------------------------------------------------ |
| `subscription.activated` | Event that triggers when the bank has confirmed that the subscription is ready to accept charges. |
| `subscription.canceled` | Event that triggers when the bank informs Fintoc that the subscription has been canceled. |
**What happens when the user creates a new Subscription Intent with the same bank account?**
Every flow checks for previous subscriptions created between the user and your organization. If already exists and is active, users see a successful screen as a confirmation and the `subscription_intent.succeeded` event with the active `subscription.id` will be sent.
# Charge flow
## Create a Charge
Fintoc uses the `Charge` object to represent a subscription payment.
From your backend, create a Charge with the amount, currency, and the `subscription_id` you got in the authorization step. You can also add the `business_profile` object for category-based billing. Here's an example:
```curl theme={null}
curl --request POST "https://api.fintoc.com/v1/charges" \
--header 'Authorization: sk_live_xxxxxxxxxxxxxxx' \
--header 'Content-Type: application/json' \
--data-raw '{
"amount": 1000,
"currency": "CLP",
"subscription_id": "xxxxxxxxx",
"business_profile": {
"name": "Merchant Name",
"tax_id": "967224006",
"category": "611090"
}
}'
```
The response should look like this:
```json theme={null}
{
"id": "ch_m7N9rAWJS9dWDKEe",
"object": "charge",
"amount": 1000,
"currency": "CLP",
"status": "pending",
"failure_code": null,
"metadata": {},
"created_at": "2021-11-11T02:29:16Z",
}
```
## Charge acknowledgment
A charge can take up to 2 business days before having acknowledgment of its success or failure:
* When created, charges have an initial status of `pending`
* Fintoc processes charges once a day at 2 pm. When this happens, the charge transitions to `in_progress`and can no longer be canceled. Charges created after 2pm (CL time) are processed on the next business day
* During the following 2 business days, the charge transitions to either succeeded or failed depending on the user's bank.
* Your user sees the charge reflected on their bank statement 2 business days after the charge is created. Your user will know if the charge succeeds before the bank notifies Fintoc.
* Charges are transferred to your bank account the next business day after they transitioned to a successful state.
Failures can happen for a number of reasons, such as insufficient funds, the charged amount being higher than the authorized amount, or the customer disabling the authorization from their bank account.
## Charges Webhooks
Once the charge is completed, we will send you an event with `charge` as its type using a webhook.
To subscribe to the event, you must first have created a Webhook Endpoint using Fintoc and assign to it the events that you want to receive.
You must subscribe to these events, as you can use them to identify successful charges from failed ones.
| Event | Description |
| :----------------- | :---------------------------------------------------------------------------------------------------------------------------------------------------------------------- |
| `charge.succeeded` | Event that triggers when a charge is validated as successful. |
| `charge.failed` | Event that triggers when a charge fails due to insufficient funds, the charged amount being higher than the authorized amount, or the user disabling the authorization. |
**Charge Succeeded vs Funds transfer**
A charge is marked as succeeded when the bank confirms Fintoc that the user has already been charged by the specified amount. This does not mean that those funds are already on your organizations' account. Fintoc has 1 business day to transfer that money to your account.
## Receiving funds in your account
Once you create a charge to your user's account, it'll take 3 to 4 business days to be available in your bank account. This depends mainly if the charge is created before/after banking schedule hour. The basic timing schedule is:
# Authorization flow
Before you can start creating charges, your user must authorize Fintoc to debit their account. This authorization is what we call a **Subscription**. As in most of Fintoc's products, your user must go through the Widget in order to create the subscription.
There are three steps to create subscriptions using Fintoc:
1. On your backend, create a `SubscriptionIntent` using your **[Secret Key](/v2023-11-15/docs/home/api-keys)**
2. Open the widget on your frontend using your **[Public Key](/v2023-11-15/docs/home/api-keys)**
3. Handle post-subscription events
## Create a Subscription Intent
To start the subscription process you must first create a Subscription Intent from your backend.
```curl theme={null}
curl --request POST "https://api.fintoc.com/v1/subscription_intents" \
--header 'Authorization: sk_live_0000000000000000' \
--header 'Content-Type: application/json'
```
The response should look like this:
```json theme={null}
{
"id": "si_m7N9rAWJS9dWDKEe",
"object": "subscription_intent",
"widget_token": "si_XXXXXXXX_sec_YYYYYYYY",
"status": "created",
"bank_account": null,
"subscription": null,
"business_profile": {
"name": "Merchant Name"
},
"created_at": "2021-11-11T02:29:16Z"
}
```
Notice that the Subscription Intent includes a `widget_token`. This token is necessary in order to open the Widget in your applications' frontend. The next section contains more details about this.
**Business Profile Name**
You can send the `business_profile.name` to customize the name to be shown as the "Recipient Company" on the widget screens.
## Open the widget for Subscriptions
Once the Subscription Intent is created, you must send its `widget_token` to your frontend and use it to configure the widget and the workflow that the user will follow.
**Widget Token**
The `widget_token` prevents your application from having to send sensitive data to Fintoc from your frontend. The token is temporary and will expire 10 minutes after its creation.
Here's an example of the widget configured with the `widget_token`:
```html theme={null}
Fintoc Demo
```
**Use the Widget callbacks and events correctly**
**Never** use the `onSuccess`, `onExit` or `onEvent` callbacks to get the state of the Subscription being created. You should **only** use these callbacks to handle the flow of your frontend application, **while waiting backend confirmation** via Webhooks. Frontend events can also be used to generate metrics about general widget usage, but you should **never** rely solely on them to assume a Subscription was created or failed to be created.
To read more about the widget and its configuration, head over to the [widget](/v2023-11-15/docs/resources/widget) section.
## Handle post-subscription events
Once a Subscription Intent finishes, you handle the subscription result in your frontend and complete the subscription in your backend. For your frontend you will use the widget callback, and for your backend you will use the events sent by webhooks.
### Handle the subscription result on your frontend
Once a Subscription Intent finishes successfully, the widget executes the `onSuccess` callback. You need to pass this function to the widget upon creation.
With this callback, you can decide what to do with your user's frontend once the subscription is complete, for example:
* Redirect the user to a post-subscription view
* Show the user a success screen.
#### Handle errors
You don't only need to handle the succeeded case because subscriptions can also fail. For example, your customer left the process before completing the subscription.
When a subscription fails or is rejected by your customer, the widget executes the `onExit` callback. With this callback, you can handle errors on your frontend. For example, you can invite your customer to use retry the process.
To obtain the reason of the error you can access the `onExit` callback creating an instance of it. Here's an example:
```javascript theme={null}
onExit: function onExit(errorReason) {
console.log(errorReason);
}
```
### Store the created subscription
To receive notifications about the subscription process, you must first have created a Webhook Endpoint using Fintoc and assign to it the events that you want to receive.
It is **very important** that you subscribe to the `subscription_intent.succeeded` event. Also you must store the included `subscription_id` in a safe place you can access later. The `subscription_id` is needed in order to create **Charges** later on.
The subscription process may generate 3 different events that are sent to your webhook endpoint:
| Event | Description |
| :------------------------------ | :---------------------------------------------------------------------------------------------------------------------------------------------------------- |
| `subscription_intent.succeeded` | Event that triggers when a subscription intent is validated as successful. The `subscription_intent` includes the resulting `subscription` object. |
| `subscription_intent.failed` | Event that triggers when a subscription intent fails due to a problem with the bank or Fintoc. |
| `subscription_intent.rejected` | Event that triggers when a subscription intent is rejected by the user. This may happen when the user rejects the MFA step or if it is entered incorrectly. |
**Backend's webhook vs widget's onSuccess**
It is **very important** for you to wait for the webhook event on your backend to finish the process. You should **never** finish the flow solely based on the `onSuccess` function from the widget. Some users may close the widget before the callback to send the webhook to your backend gets executed.
### Wait for subscription activation
The created subscription starts with a `pending` status. This indicates that the subscription was created correctly but charges can not be created yet. First, Fintoc needs the bank to confirm that the subscription is operational.
A new subscription can take up to 5 business days for it to be operational. Once a subscription is validated as ready to receive charges, a `subscription.activated` event is triggered and sent via webhooks.
If for any reason the bank informs Fintoc that a subscription has been canceled, a `subscription.canceled` event will be triggered
| Event | Description |
| :----------------------- | :------------------------------------------------------------------------------------------------ |
| `subscription.activated` | Event that triggers when the bank has confirmed that the subscription is ready to accept charges. |
| `subscription.canceled` | Event that triggers when the bank informs Fintoc that the subscription has been canceled. |
**What happens when the user creates a new Subscription Intent with the same bank account?**
Every flow checks for previous subscriptions created between the user and your organization. If already exists and is active, users see a successful screen as a confirmation and the `subscription_intent.succeeded` event with the active `subscription.id` will be sent.
# Charge flow
## Create a Charge
Fintoc uses the `Charge` object to represent a subscription payment.
From your backend, create a Charge with the amount, currency, and the `subscription_id` you got in the authorization step. You can also add the `business_profile` object for category-based billing. Here's an example:
```curl theme={null}
curl --request POST "https://api.fintoc.com/v1/charges" \
--header 'Authorization: sk_live_xxxxxxxxxxxxxxx' \
--header 'Content-Type: application/json' \
--data-raw '{
"amount": 1000,
"currency": "CLP",
"subscription_id": "xxxxxxxxx",
"business_profile": {
"name": "Merchant Name",
"tax_id": "967224006",
"category": "611090"
}
}'
```
The response should look like this:
```json theme={null}
{
"id": "ch_m7N9rAWJS9dWDKEe",
"object": "charge",
"amount": 1000,
"currency": "CLP",
"status": "pending",
"failure_code": null,
"metadata": {},
"created_at": "2021-11-11T02:29:16Z",
}
```
## Charge acknowledgment
A charge can take up to 2 business days before having acknowledgment of its success or failure:
* When created, charges have an initial status of `pending`
* Fintoc processes charges once a day at 2 pm. When this happens, the charge transitions to `in_progress`and can no longer be canceled. Charges created after 2pm (CL time) are processed on the next business day
* During the following 2 business days, the charge transitions to either succeeded or failed depending on the user's bank.
* Your user sees the charge reflected on their bank statement 2 business days after the charge is created. Your user will know if the charge succeeds before the bank notifies Fintoc.
* Charges are transferred to your bank account the next business day after they transitioned to a successful state.
Failures can happen for a number of reasons, such as insufficient funds, the charged amount being higher than the authorized amount, or the customer disabling the authorization from their bank account.
## Charges Webhooks
Once the charge is completed, we will send you an event with `charge` as its type using a webhook.
To subscribe to the event, you must first have created a Webhook Endpoint using Fintoc and assign to it the events that you want to receive.
You must subscribe to these events, as you can use them to identify successful charges from failed ones.
| Event | Description |
| :----------------- | :---------------------------------------------------------------------------------------------------------------------------------------------------------------------- |
| `charge.succeeded` | Event that triggers when a charge is validated as successful. |
| `charge.failed` | Event that triggers when a charge fails due to insufficient funds, the charged amount being higher than the authorized amount, or the user disabling the authorization. |
**Charge Succeeded vs Funds transfer**
A charge is marked as succeeded when the bank confirms Fintoc that the user has already been charged by the specified amount. This does not mean that those funds are already on your organizations' account. Fintoc has 1 business day to transfer that money to your account.
## Receiving funds in your account
Once you create a charge to your user's account, it'll take 3 to 4 business days to be available in your bank account. This depends mainly if the charge is created before/after banking schedule hour. The basic timing schedule is:
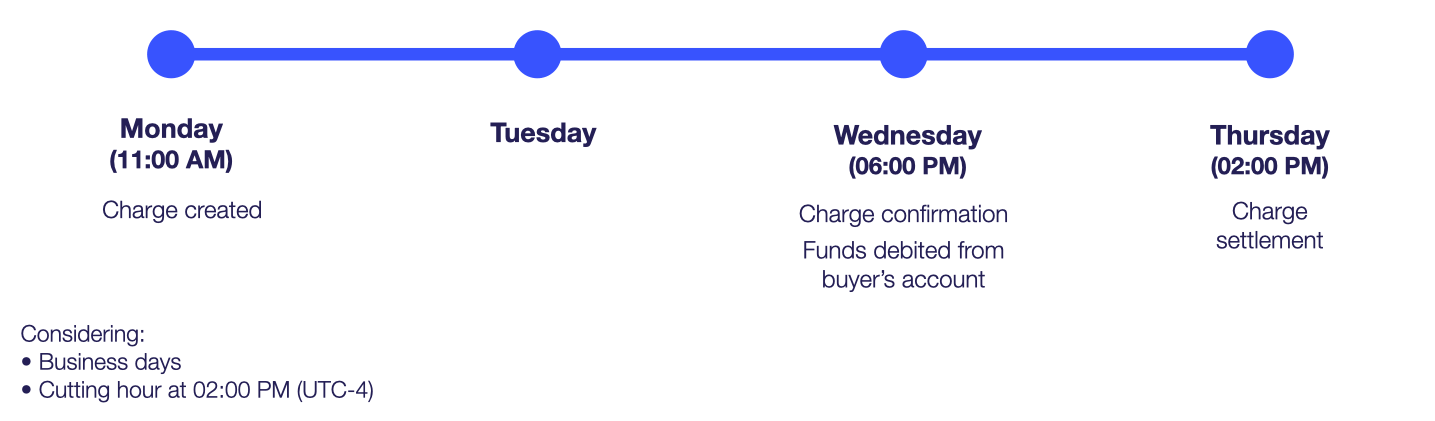
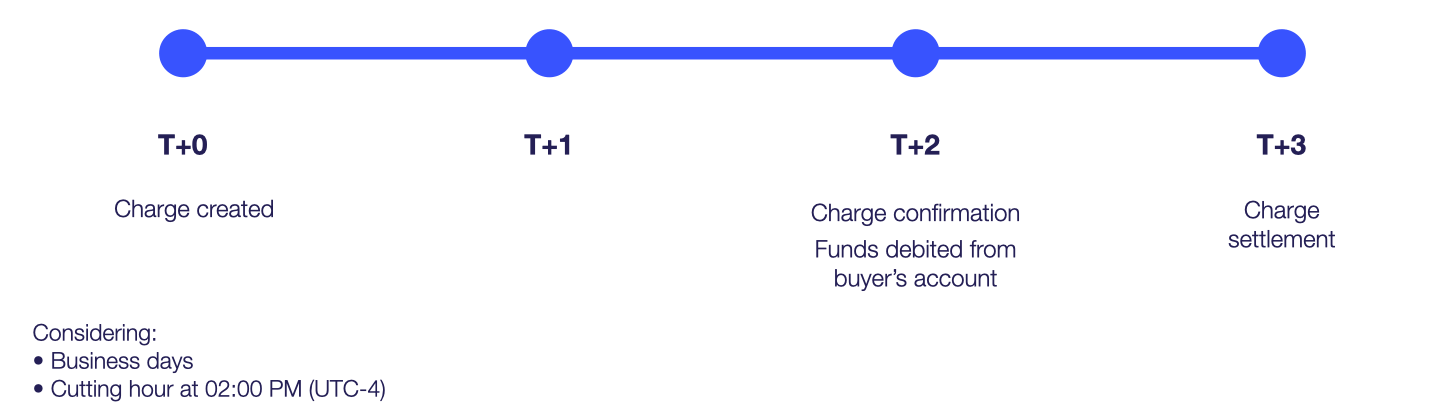 Let's see an example of a charge created at 11:00 AM, before the banking cutting hour (02:00 PM):
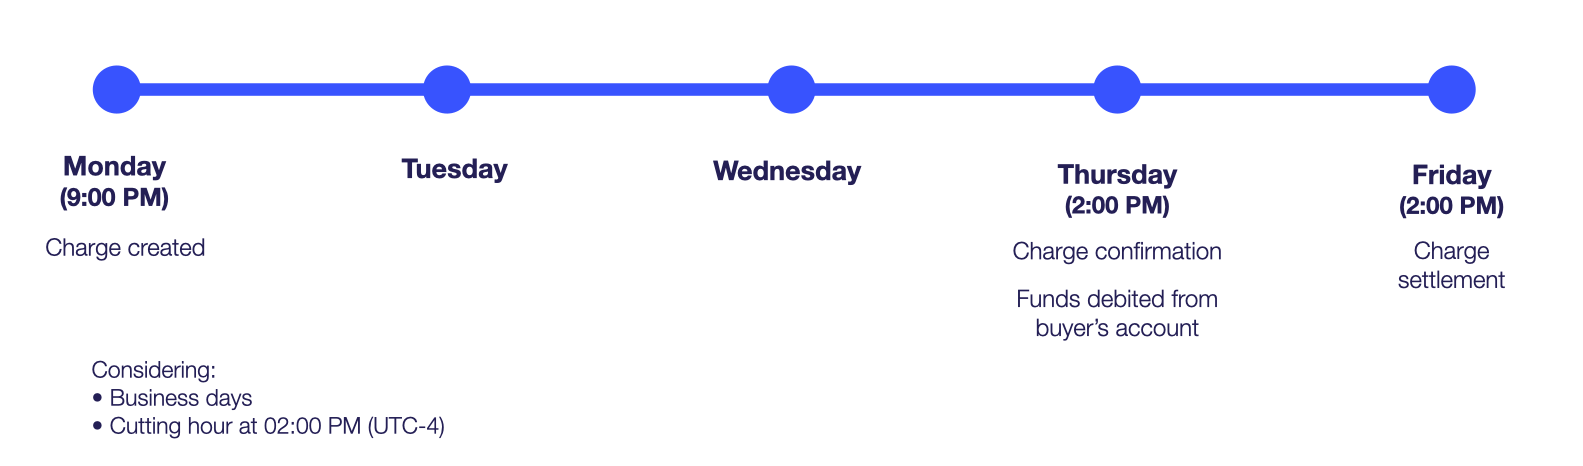
 Now, let's see another example of a charge created at 09:00 PM, after the banking cutting hour (02:00 PM):
 # Available Banks
| Nombre | id |
| :--------------- | :-------------------- |
| Banco de Chile | `cl_banco_de_chile` |
| Banco Scotiabank | `cl_banco_scotiabank` |
| Banco Itaú | `cl_banco_itau` |
| Banco Bci | `cl_banco_bci` |
| Banco Falabella | `cl_banco_falabella` |
| Banco Santander | `cl_banco_santander` |
| Banco Estado | `cl_banco_estado` |
# Available Banks
| Nombre | id |
| :--------------- | :-------------------- |
| Banco de Chile | `cl_banco_de_chile` |
| Banco Scotiabank | `cl_banco_scotiabank` |
| Banco Itaú | `cl_banco_itau` |
| Banco Bci | `cl_banco_bci` |
| Banco Falabella | `cl_banco_falabella` |
| Banco Santander | `cl_banco_santander` |
| Banco Estado | `cl_banco_estado` |