> ## Documentation Index
> Fetch the complete documentation index at: https://docs.fintoc.com/llms.txt
> Use this file to discover all available pages before exploring further.
# Receiving transfers
> Automatically track and reconcile your incoming payments in real time.
# 🇲🇽 Inbound Transfers in Mexico
To start using Fintoc's Transfers API to receive inbound transfers, once you have completed the setup guide, you just need to follow these steps:
1. Find or create an `AccountNumber`—or a SPEI [CLABE](https://es.wikipedia.org/wiki/CLABE)— using your **Secret key**. When you log into the dashboard will start out with one **Default Account Number**.
2. Create a `WebhookEndpoint` to handle incoming transfer events
3. Receive a transfer at the created `AccountNumber` and get notified in real-time
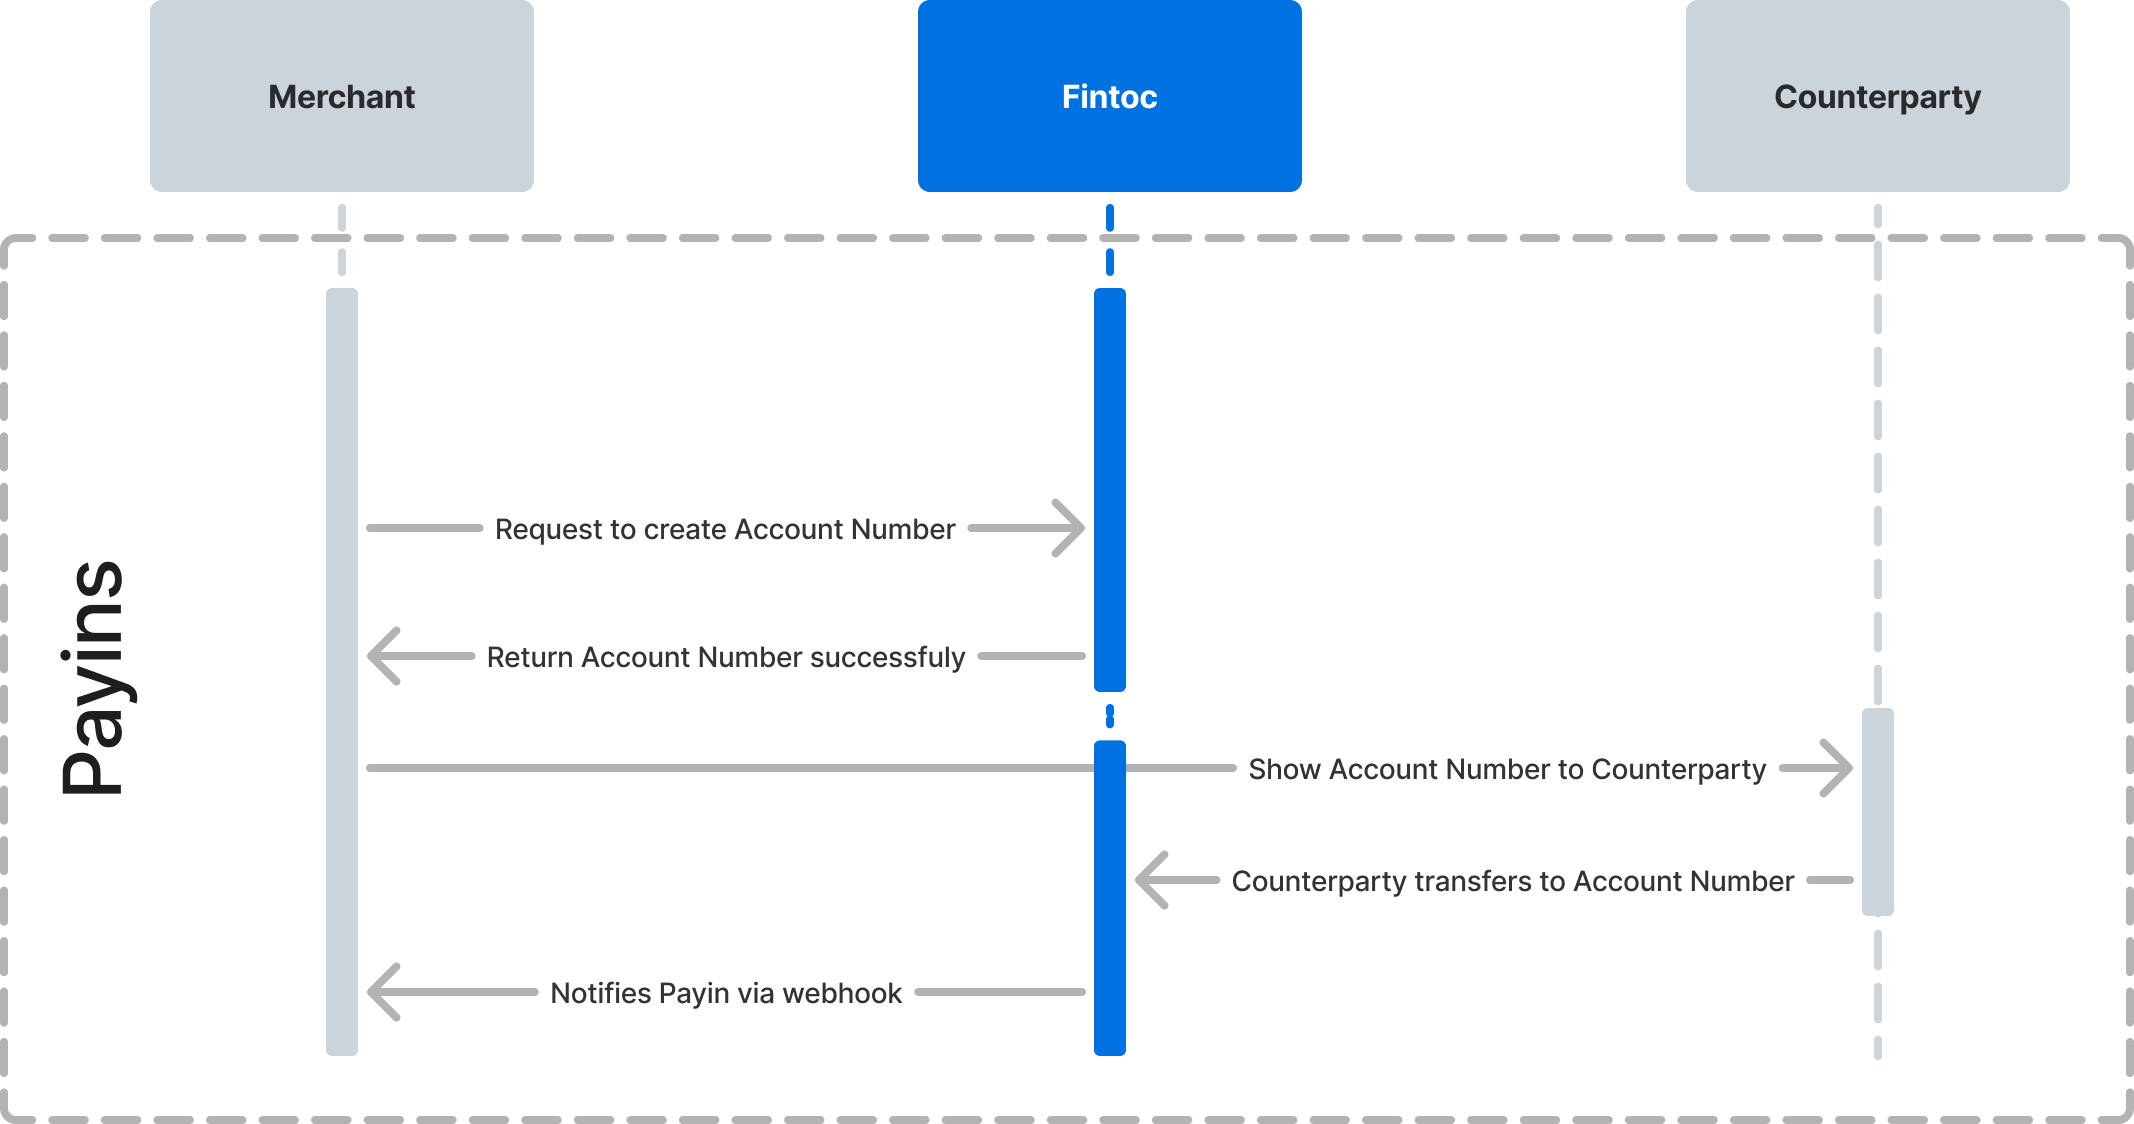
The following diagram shows how Fintoc will interact with you and the counterparty creating the payin.
## Step 1: Create an Account Number (SPEI CLABE)
An `AccountNumber` represents a SPEI CLABE. You can think of an account number as a reference that you can assign to a customer—or order— to easily reconcile your incoming payments. Companies usually assign one `Account Number` per customer so that when they receive a transfer to that `Account Number`, they automatically know that it comes from that specific customer. To learn more about Account Numbers, see the [data model](/v2023-11-15/docs/transfers/transfers-overview/v2-transfers-account-number-data-model).
### Attach arbitrary key-value data to your account number
When you create an account number, you can attach arbitrary key-value data to it using the Metadata object. You can use metadata to store your unique identifier for that account number, such as your internal customer ID. When you receive an inbound transfer, the metadata object will be attached so you can easily reconcile the transfer against your internal records.
### Example
Using your test **Secret Key**, and your **Account ID** create an `AccountNumber` from your backend, attaching an internal customer ID `id_cliente`:
```curl theme={null}
curl --request POST \
--url https://api.fintoc.com/v2/account_numbers \
--header 'Authorization: sk_test_9c8d8CeyBTx1VcJzuDgpm4H' \
--header 'accept: application/json' \
--header 'content-type: application/json' \
--data '
{
"account_id": "acc_Lq7dP901xZgA2B",
"metadata": {
"id_cliente": "12343212"
}
}
'
```
The response should look like this:
```json theme={null}
{
"id": "acno_Kasf91034gj1AD",
"object": "account_number",
"description": "My payins",
"number": "738969123456789120",
"account_id": "acc_Lq7dP901xZgA2B",
"created_at": "2024-03-01T20:09:42.949787176Z",
"mode": "test",
"metadata": {
"id_cliente": "12343212"
}
}
```
### Using our SDK
If you are using our Python SDK or Node SDK, you can create the account number like this:
```python Python theme={null}
account_number = client.v2.account_numbers.create(
account_id="acc_M8sKf230BgHjD4",
metadata={"id_cliente": "12343212"}
)
```
```node Node theme={null}
const accountNumber = await fintoc.v2.accountNumbers.create({
account_id: 'acc_M8sKf230BgHjD4',
metadata: {
'id_cliente': '1234324',
},
});
```
## Step 2: Create a Webhook Endpoint to handle inbound transfer events
Whenever you receive an inbound transfer, Fintoc will send you `transfer.inbound.succeeded` event. Follow the [webhook guide](/v2023-11-15/docs/resources/webhooks-walkthrough) to learn how to create a Webhook Endpoint to receive these events and run actions.
The `transfer.inbound.succeeded` event looks like this:
```json json theme={null}
{
"id": "evt_a4xK32BanKWYn",
"type": "transfer.inbound.succeeded",
"object": "event",
"data": {
"id": "tr_jKaHD105H",
"object": "transfer",
"direction": "inbound",
"status": "succeeded",
"amount": 2864,
"currency": "MXN",
"mode": "test",
"post_date": "2020-04-17T00:00:00.000Z",
"transaction_date": "2020-04-17T05:12:41.462Z",
"comment": "Electricity bill",
"reference_id": "130824",
"receipt_url": "https://www.banxico.org.mx/cep/",
"tracking_key": "s2123423423324334",
"return_reason": null,
"account_number": {
"id": "acno_Kasf91034gj1AD",
"object": "account_number",
"account_id": "acc_Jas92lf9adg94ka",
"description": "My payins",
"number": "738969123456789120",
"created_at": "2024-03-01T20:09:42.949787176Z",
"mode": "test",
"metadata": {
"client_id": "12343212"
}
},
"counterparty": {
"holder_id": "OODC911119JL3",
"holder_name": "Carmen Marcela",
"account_number": "012969123456789120",
"type": "clabe",
"institution": {
"id": "40012",
"name": "BBVA Mexico",
"country": "mx"
}
}
},
"created_at": "2020-04-22T21:10:19.254Z",
"mode": "test"
}
```
## Step 3: Receive a transfer at the account number
Now that you have created an account number and added a webhook endpoint to handle notifications, you can transfer to it and start reconciling your payments.
If you want to try everything in test mode, you can use our `/simulate/receive-transfer` endpoint to simulate an inbound transfer. The behavior is identical to what would happen if you send a real transfer to the specified account number. See [our test guide](/v2023-11-15/docs/transfers/test-your-integration) to learn how you can simulate a transfer.
# 🇨🇱 Inbound Transfers in Chile
To start using Fintoc's Transfers API to receive inbound transfers, once you have completed the setup guide, you just need to follow these steps:
1. Create a `WebhookEndpoint` to handle incoming transfer events
2. Receive a transfer at your `Account` and get notified in real-time
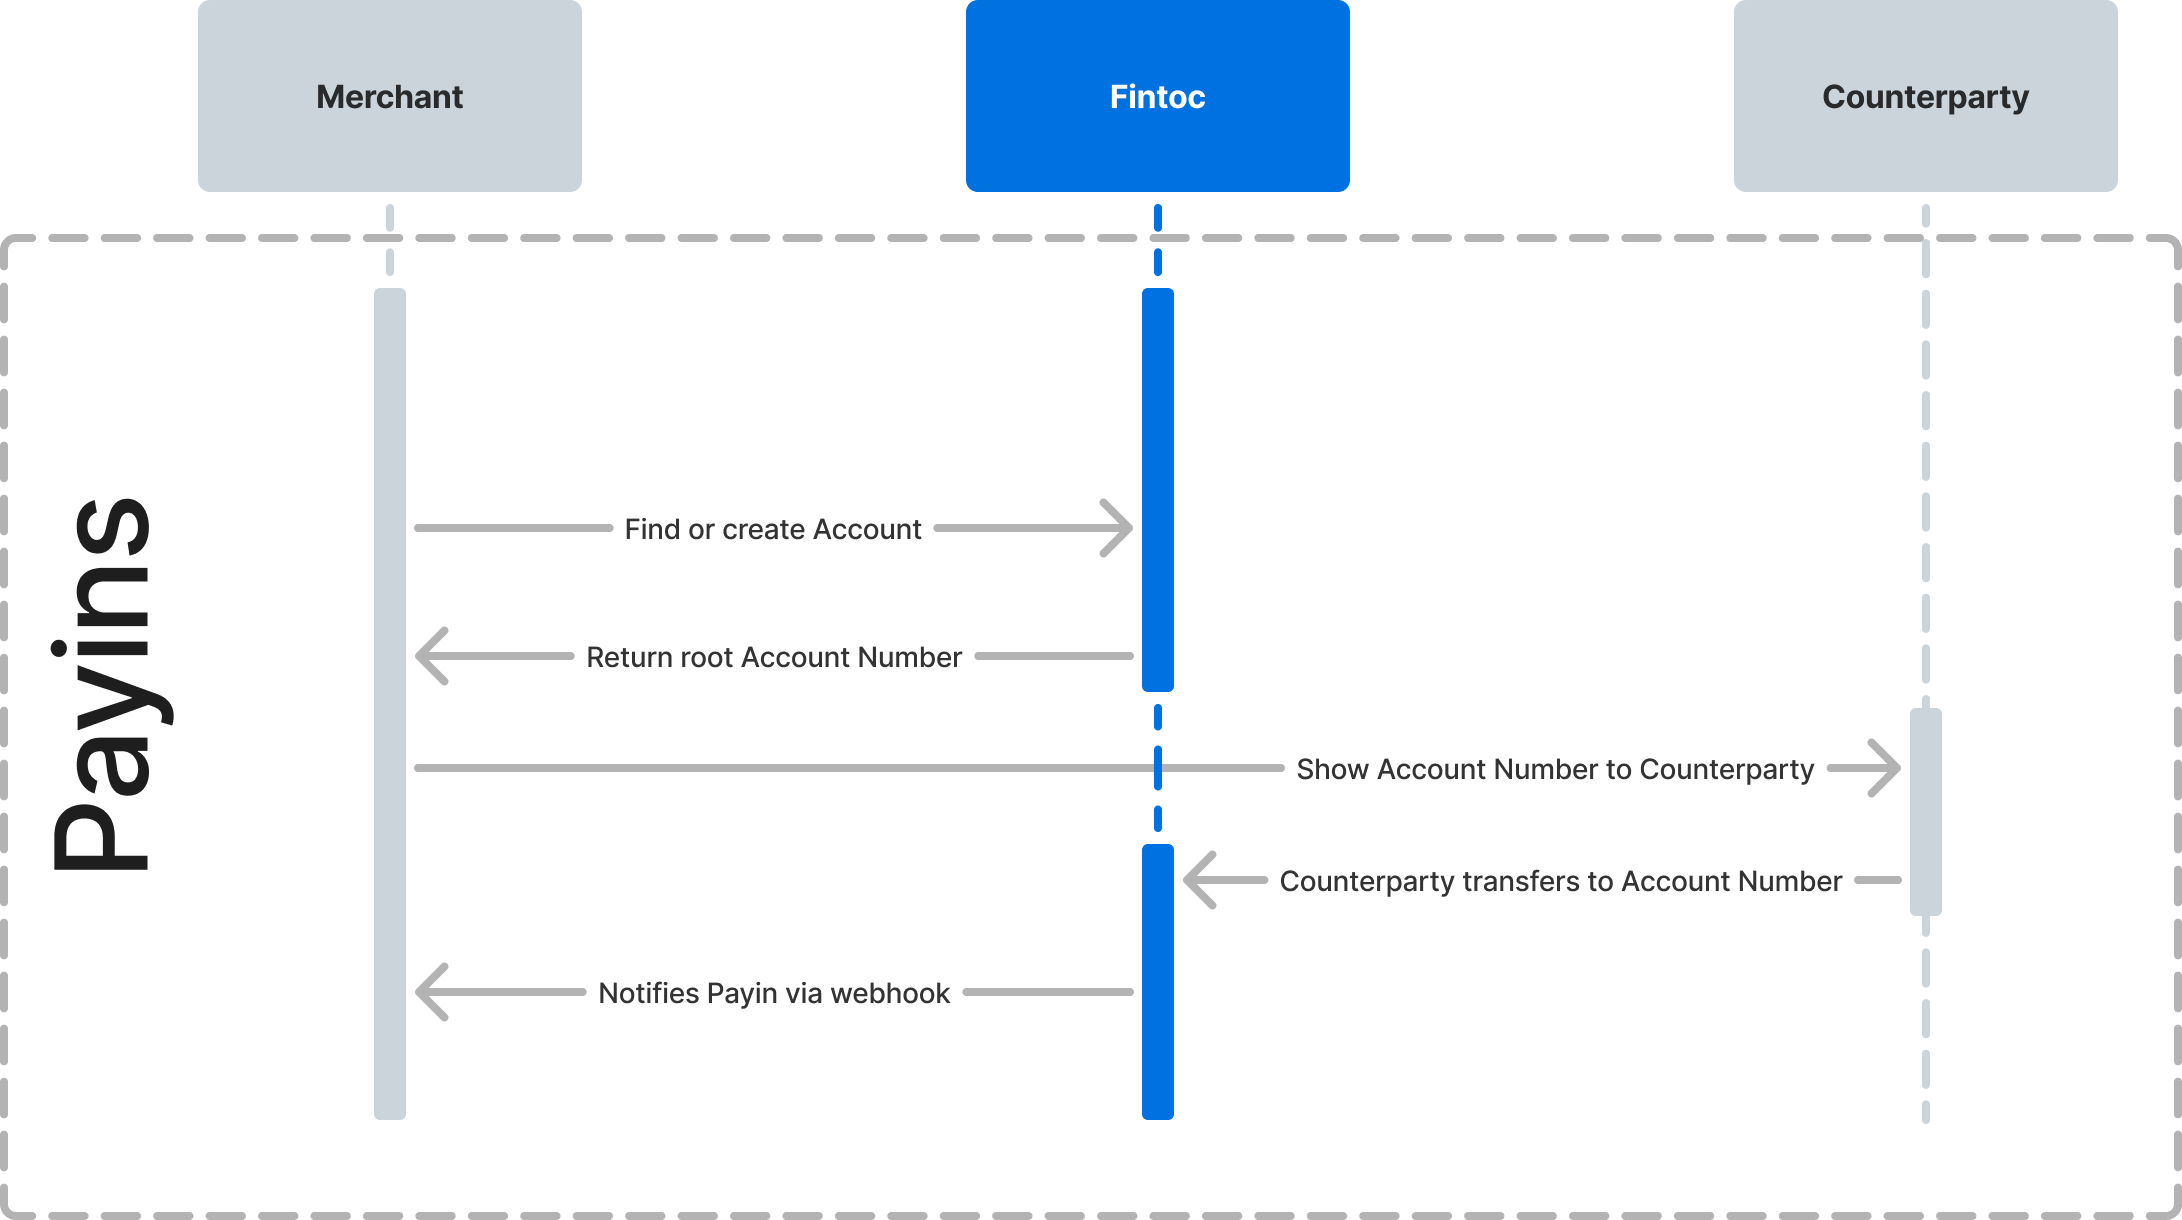
The following diagram shows how Fintoc will interact with you and the counterparty creating the Payin.
 ## Step 1: Create a Webhook Endpoint to handle inbound transfer events
Whenever you receive an inbound transfer, Fintoc will send you `transfer.inbound.succeeded` event. Follow the [webhook guide](/v2023-11-15/docs/resources/webhooks-walkthrough) to learn how to create a Webhook Endpoint to receive these events and run actions.
The `transfer.inbound.succeeded` event looks like this:
```json json theme={null}
{
"id": "evt_a4xK32BanKWYn",
"type": "transfer.inbound.succeeded",
"object": "event",
"data": {
"id": "tr_jKaHD105H",
"object": "transfer",
"direction": "inbound",
"status": "succeeded",
"amount": 2864,
"currency": "CLP",
"mode": "test",
"post_date": "2020-04-17T00:00:00.000Z",
"transaction_date": "2020-04-17T05:12:41.462Z",
"comment": "Electricity bill",
"reference_id": null,
"receipt_url": null,
"tracking_key": null,
"return_reason": null,
"account_number": {
"id": "acno_Kasf91034gj1AD",
"object": "account_number",
"account_id": "acc_Jas92lf9adg94ka",
"description": "My payins",
"number": "738969123456789120",
"created_at": "2024-03-01T20:09:42.949787176Z",
"mode": "test",
"metadata": {
"client_id": "12343212"
}
},
"counterparty": {
"holder_id": "24354783K",
"holder_name": "Carmen Marcela",
"account_number": "012969123456789120",
"type": "checking_account",
"code": "01",
"institution": {
"id": "cl_banco_santander",
"name": "Banco Santander",
"country": "cl"
}
}
},
"created_at": "2020-04-22T21:10:19.254Z",
"mode": "test"
}
```
## Step 2: Receive a transfer at your Account number
Now that you have identified your Account and its `root_account_number` and added a webhook endpoint to handle notifications, you can transfer to it and start reconciling your payments.
If you want to try everything in test mode, you can use our `/simulate/receive_transfer` endpoint to simulate an inbound transfer. The behavior is identical to what would happen if you send a real transfer to the specified account number. See [our test guide](/v2023-11-15/docs/transfers/test-your-integration) to learn how you can simulate a transfer.
## Step 1: Create a Webhook Endpoint to handle inbound transfer events
Whenever you receive an inbound transfer, Fintoc will send you `transfer.inbound.succeeded` event. Follow the [webhook guide](/v2023-11-15/docs/resources/webhooks-walkthrough) to learn how to create a Webhook Endpoint to receive these events and run actions.
The `transfer.inbound.succeeded` event looks like this:
```json json theme={null}
{
"id": "evt_a4xK32BanKWYn",
"type": "transfer.inbound.succeeded",
"object": "event",
"data": {
"id": "tr_jKaHD105H",
"object": "transfer",
"direction": "inbound",
"status": "succeeded",
"amount": 2864,
"currency": "CLP",
"mode": "test",
"post_date": "2020-04-17T00:00:00.000Z",
"transaction_date": "2020-04-17T05:12:41.462Z",
"comment": "Electricity bill",
"reference_id": null,
"receipt_url": null,
"tracking_key": null,
"return_reason": null,
"account_number": {
"id": "acno_Kasf91034gj1AD",
"object": "account_number",
"account_id": "acc_Jas92lf9adg94ka",
"description": "My payins",
"number": "738969123456789120",
"created_at": "2024-03-01T20:09:42.949787176Z",
"mode": "test",
"metadata": {
"client_id": "12343212"
}
},
"counterparty": {
"holder_id": "24354783K",
"holder_name": "Carmen Marcela",
"account_number": "012969123456789120",
"type": "checking_account",
"code": "01",
"institution": {
"id": "cl_banco_santander",
"name": "Banco Santander",
"country": "cl"
}
}
},
"created_at": "2020-04-22T21:10:19.254Z",
"mode": "test"
}
```
## Step 2: Receive a transfer at your Account number
Now that you have identified your Account and its `root_account_number` and added a webhook endpoint to handle notifications, you can transfer to it and start reconciling your payments.
If you want to try everything in test mode, you can use our `/simulate/receive_transfer` endpoint to simulate an inbound transfer. The behavior is identical to what would happen if you send a real transfer to the specified account number. See [our test guide](/v2023-11-15/docs/transfers/test-your-integration) to learn how you can simulate a transfer.