

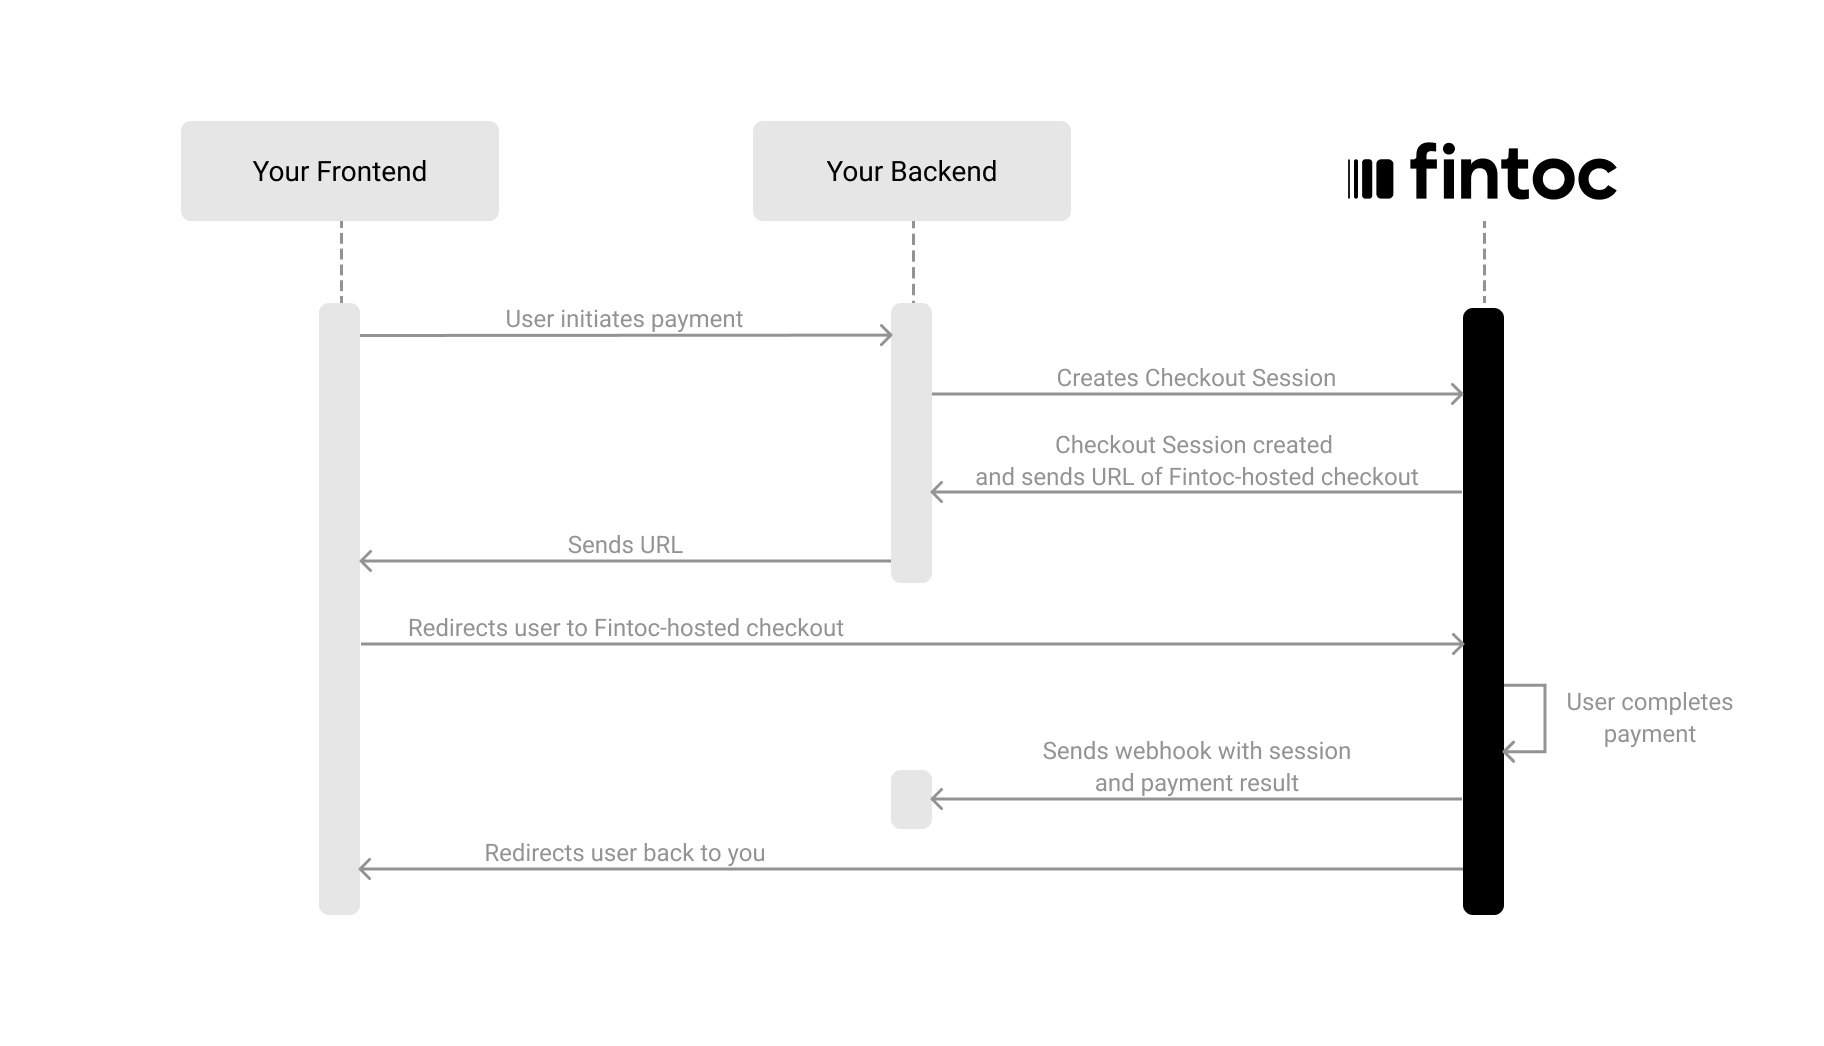
- On your backend, create a
Checkout Sessionusing your Secret Key - Redirect your user to complete the payment on the Fintoc-hosted checkout page
- Handle post-payments events
Optional: install our backend SDK
Create a session
The Checkout Session object represents your intent to collect a payment from a customer and tracks state changes throughout the payment process. Using your Secret Key, create aCheckout Session from your backend with the required parameters: amount, currency, success_urland cancel_url like the example bellow:
Node
Send the Business Profile object if you are processing payments for a submerchantYou can also add the
business_profile object when creating a session to customize the name displayed as the “Recipient” on the payment flow.Read here to learn more.Include Customer Data (Optional)
When creating aCheckout Session, you can include customer information. This allows Fintoc to display only the available payment methods for that specific customer, such as verifying if the amount exceeds the transaction limit for a selected bank in the payment initiation method.
Bank specific payment flows for business accounts and high amountsIn bank_transfer payments in Chile, if the the payment is above the transaction limits or you send a
customer with a tax_id.value of a business instead of a natural person, Fintoc will allow only banks that has special payment flows for tis type of transactions (Banco Estado, Banco de Chile and Banco Santander). You can test it use this credentials.Pre-select a Payment Method (Optional)
You can create aCheckout Session without specifying payment methods. In this case, users can select from all available options on the Fintoc-hosted checkout page, based on the session parameters (amount, customer, currency) and the payment methods you have enabled in Fintoc.
Alternatively, you can explicitly define the payment method(s) for the session. For example, in the request below, the payment_initiation method is set, combined with payment_method_options, where the institution cl_banco_estado is pre-selected for the user. In this scenario, the payment flow presented to the user will be limited to this specific method and bank.
Node
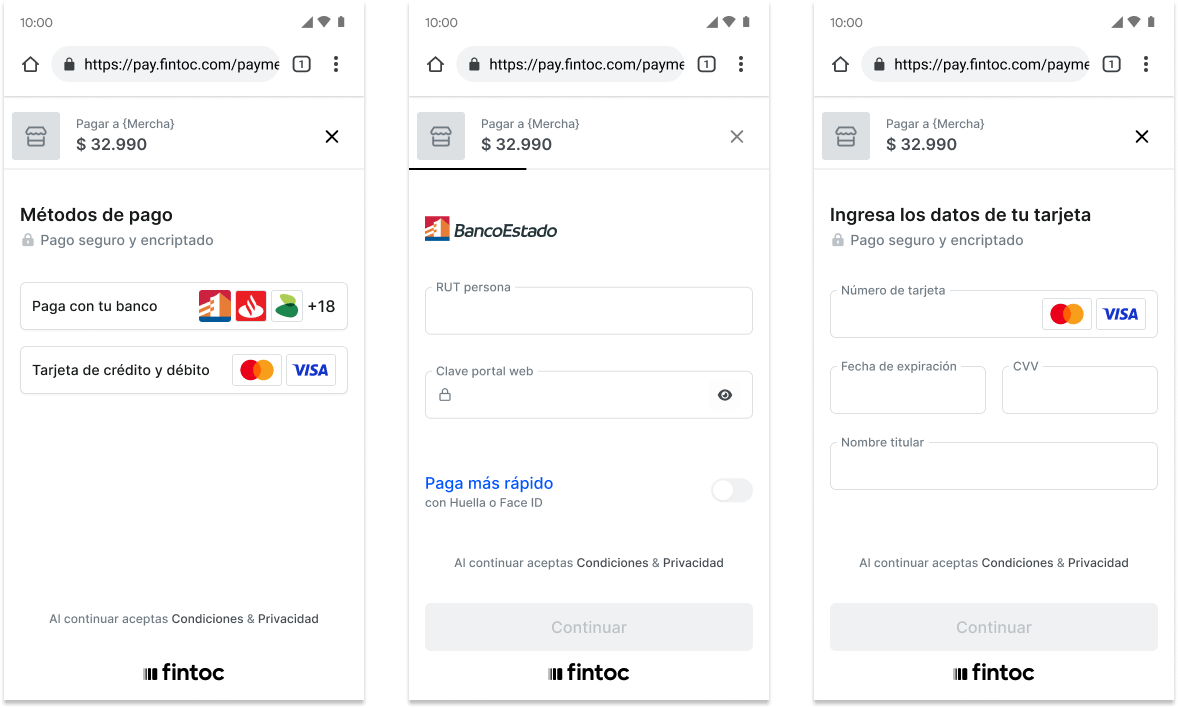
Left: Default view showing all available methods (bank transfer and cards) when no payment_method parameter is set. Center: Pre-selected bank transfer flow for Banco Estado, displaying the institution-specific payment form directly. Right: Pre-selected cardflow.
Using your own Checkout PageWhen you have your own checkout page, you should set the
payment_method to redirect users to the Fintoc-hosted checkout after they’ve already selected their preferred payment method.This skips Fintoc’s payment method selection screen and directs users straight to the specific payment flow, instead of letting Fintoc manage the full checkout experience.Response when creating a Checkout Session
After making the request to create the Checkout Session, Fintoc should respond with something like this:redirect_url attribute. In the following step, you’ll use this attribute to redirect the user to complete the payment.
Redirect the user to complete the payment
Next, you will redirect users to the Fintoc-hosted checkout page. After completing the payment, they’ll be automatically redirected back to your site. Based on the payment result, the user will be redirected to either the success or cancel URL.Handle post-payments events
Once a Checkout Session finishes, you handle the payment result in your frontend and complete the payment in your backend. For your backend, you will use the events sent by webhooks.Complete the payment on your backend
Fintoc sends acheckout_session.finished and a payment_intent.succeeded event when the session completes and the payment is successful. Use the follow the webhook guide to receive these events and run actions, such as sending an order confirmation email to your customer, logging the sale in a database, or starting a shipping workflow.
The checkout_session.finished event includes information about the session and the payment_intent:
Handling async payments after the Checkout Session endsIn some cases, the Checkout Session may finish with a payment that does not yet have a final status, such as
requires_action. This can happen, for example, when a bank transfer from a business account requires approval from more than one representative.In these cases, when receiving the payment_intent.requires_action you should inform the user that the payment is pending approval. Once you receive either the payment_intent.succeeded or payment_intent.failed event, you should notify the user of the final payment status as soon as it is confirmed.Test your integration
Using your test mode API Secret Key, you can create payments that simulate successful and failed outcomes without moving any money. This lets you validate your full payment flow end-to-end:- Your backend API requests (creating sessions and handling responses)
- The redirect flow from your frontend to the
redirect_urland back to thesuccess_urlorcancel_urlafter the payment - Webhook for post-payment events