Accept a payment
Accept one-time payments in CLP or MXN through a Fintoc-hosted checkout page
Build a payment flow that collects one-time payments in CLP or MXN through a Fintoc-hosted checkout page.
To accept payments with Fintoc, you complete three steps:
- On your backend, create a
Checkout Sessionusing your Secret Key - Redirect your customer to complete the payment on the Fintoc-hosted checkout page
- Handle post-payment events
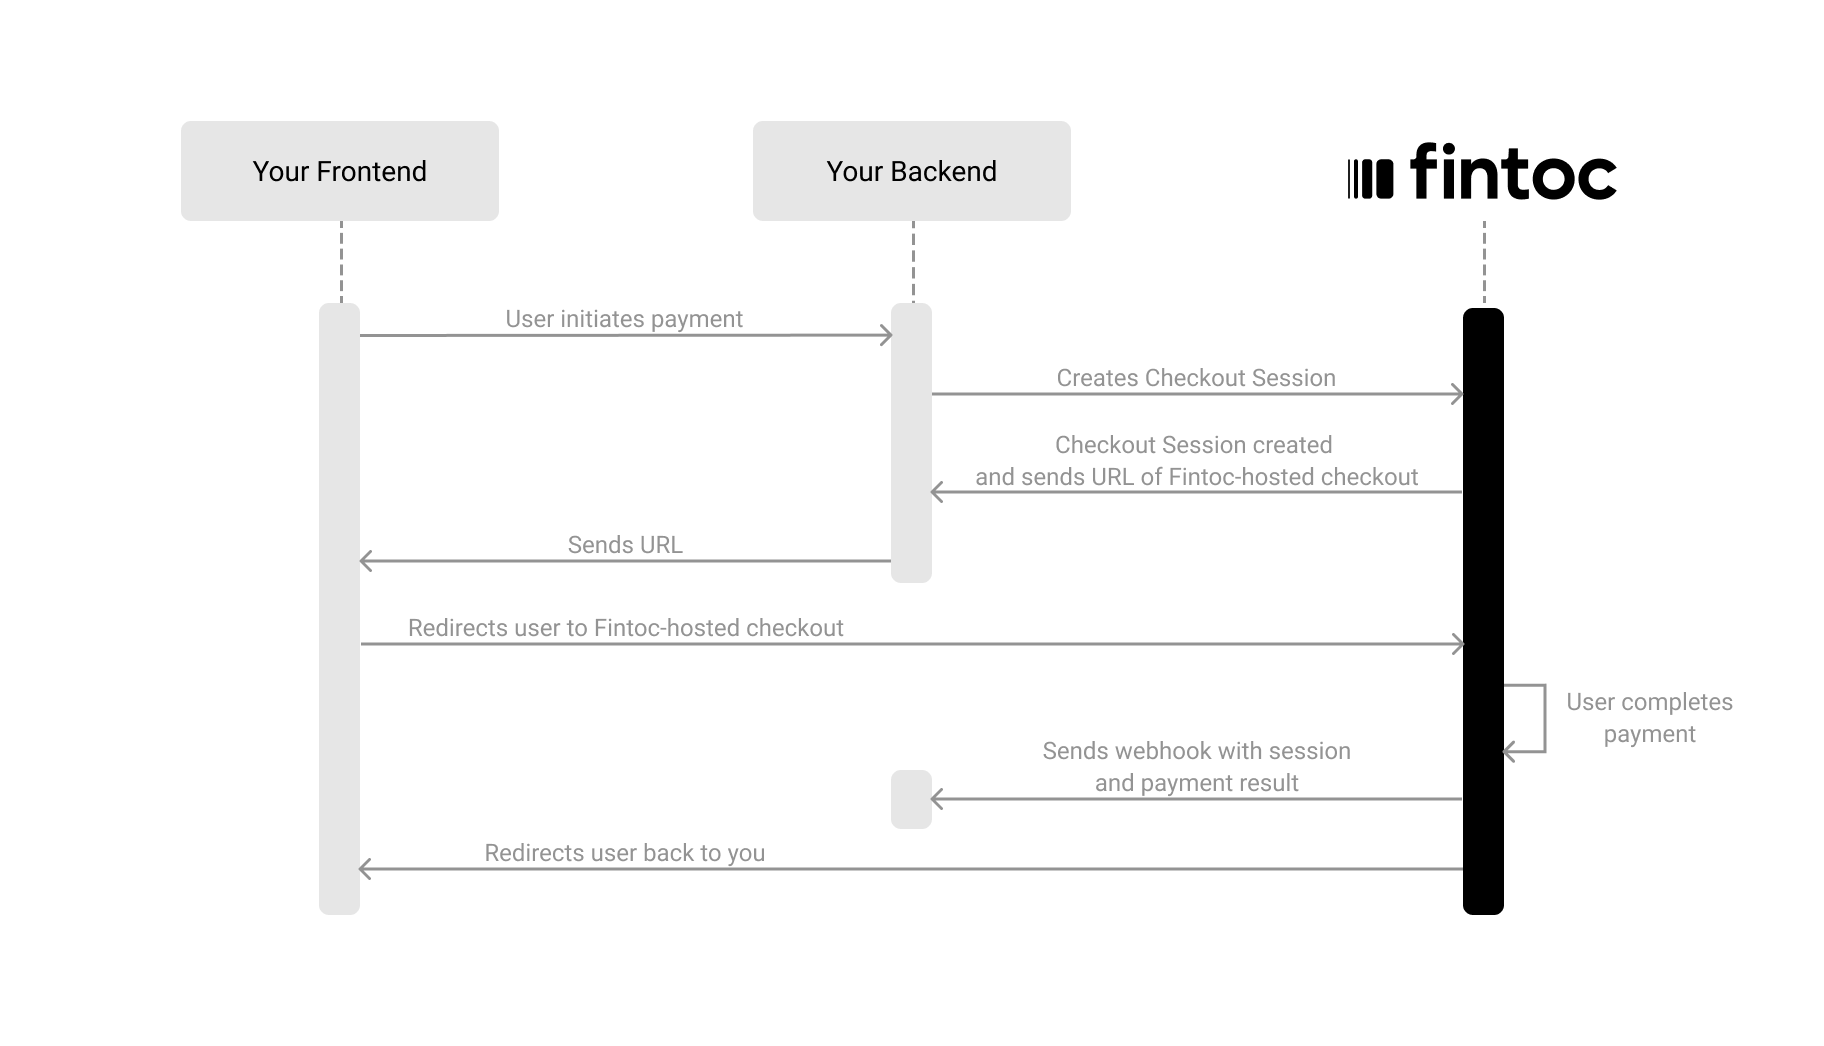
The following diagram shows how Fintoc interacts with both your backend and your frontend:
Optional: install the backend SDK
If you’re using Python, you can install our Python SDK to make it easier to interact with our API. The SDK automatically handles pagination, lets you easily verify Fintoc's webhooks, and offers many other helpful features.
pip install fintocCreate a session
The Checkout Session object represents your intent to collect a payment from a customer and tracks state changes throughout the payment process.
Using your Secret Key, create a Checkout Session from your backend with the required parameters: amount, currency, success_url, and cancel_url, like the example below:
Server
curl --request POST "https://api.fintoc.com/v2/checkout_sessions" \
  --header "Authorization: YOUR_TEST_SECRET_API_KEY" \
  --header "Content-Type: application/json" \
  --data-raw '{
    "amount": 350000,
    "currency": "CLP",
    "success_url": "https://merchant.com/success",
    "cancel_url": "https://merchant.com/cancel",
    "customer_data": {
      "tax_id": {
        "type": "cl_rut",
        "value": "11.111.111-1"
      },
      "name": "Felipe Castro",
      "email": "[email protected]",
      "metadata": {}
    },
    "metadata": {
      "order": "987654321"
    }
  }'
const { Fintoc } = require('fintoc');
const fintoc = new Fintoc('YOUR_TEST_SECRET_API_KEY');
const checkoutSession = await fintoc.checkoutSessions.create({
amount: 350000,
currency: 'CLP',
success_url: 'https://merchant.com/success',
cancel_url: 'https://merchant.com/cancel',
customer_data: {
tax_id: {
type: 'cl_rut',
value: '11.111.111-1'
},
name: 'Felipe Castro',
email: '[email protected]',
metadata: {}
},
metadata: {
order: '987654321'
}
});from fintoc import Fintoc
client = Fintoc('YOUR_TEST_SECRET_API_KEY')
checkout_session = client.checkout_sessions.create(
amount=350000,
currency='CLP',
success_url='https://merchant.com/success',
cancel_url='https://merchant.com/cancel',
customer_data={
'tax_id': {
'type': 'cl_rut',
'value': '11.111.111-1'
},
'name': 'Felipe Castro',
'email': '[email protected]',
'metadata': {}
},
metadata={
'order': '987654321'
}
)Fintoc responds with the created Checkout Session object, including the redirect_url you use to send the customer to the payment:
{
  "id": "cs_li5531onlFDi235",
  "object": "checkout_session",
  "mode": "test",
  "status": "created",
  "amount": 350000,
  "currency": "CLP",
  "created_at": "2024-06-04T15:32:46.721Z",
  "updated_at": "2024-06-04T15:32:46.721Z",
  "success_url": "https://merchant.com/success",
  "cancel_url": "https://merchant.com/cancel",
  "redirect_url": "https://pay.fintoc.com/checkout/cs_li5531onlFDi235",
  "metadata": {
    "order": "987654321"
  },
  "customer": {
    "id": "cus_3B2bODrQFje7ZVkT69xyaTSDwXQ",
    "object": "customer",
    "name": "Felipe Castro",
    "email": "[email protected]",
    "metadata": {},
    "tax_id": {
      "type": "cl_rut",
      "value": "11.111.111-1"
    }
  }
}| Parameter | Example | Description |
|---|---|---|
amount | 350000 | Required. A positive integer representing the amount to charge, in the smallest currency unit. CLP has no minor unit, so 350000 means CLP 350000. MXN uses centavos, so 350000 means MXN 3500.00. Read more about currencies. |
currency | CLP or MXN | Required. Three-letter ISO 4217 currency code. Fintoc supports CLP and MXN; see the supported currencies for the full list. |
success_url | https://merchant.com/success | Required. URL Fintoc redirects the customer to after a successful payment. |
cancel_url | https://merchant.com/cancel | Required. URL Fintoc redirects the customer to if they cancel the payment and return to your website. |
metadata | {"order": "987654321"} | Set of key-value pairs you can attach to an object, useful for storing additional information in a structured format. |
Business profile (optional)
Send the Business Profile object if you are processing payments for a submerchantYou can also add the
business_profileobject when creating a session to customize the name displayed as the "Recipient" on the payment flow.
Include customer data (optional)
When creating a Checkout Session, you can include customer information by sending a customer_data object (or customer with the id of an existing Customer). This information allows Fintoc to display only the payment methods available for that specific customer. For example, Fintoc hides a bank when the amount exceeds its transaction limit.
| Attribute | Type | Description |
|---|---|---|
tax_id | object | Required if no It includes a If a |
name | string | Full name of the customer. |
email | string | Required if no tax_id. Email address of the customer. |
metadata | object | Custom data that stores additional information about the customer, such as internal IDs, CRM references, or tags. |
Bank specific payment flows for business accounts and high amountsIn Chile, some
bank_transferpayments require banks with special payment flows: Banco Estado, Banco de Chile, and Banco Santander. Fintoc limits the session to these banks when the payment exceeds the transaction limits or thecustomerhas atax_id.valueof a business instead of a natural person. You can test this flow with these credentials.
Include a list of items (optional)
When creating a Checkout Session, you can also send the line_items, including information about the items of the session. This enables Fintoc to display this information on the checkout page and show only the payment methods available for specific products.
Each item should have:
| Attribute | Type | Description |
|---|---|---|
quantity | integer | Required. Number of units of this item being purchased. |
price_data | object | Required. Object with the price of the item and its product details. |
The price_data object
price_data object| Attribute | Type | Description |
|---|---|---|
product_data | object | Required. Object with information about the product, such as its name and image. |
currency | string | Required. Three-letter ISO 4217 currency code (for example, CLP, MXN). |
unit_amount | integer | Required. Price per unit of the item, in the smallest currency unit. CLP has no minor unit, so 350000 means CLP 350000. |
The product_data object
product_data objectThe price_data object contains a product_data object with product information:
| Attribute | Type | Description |
|---|---|---|
name | string | Required. Name of the product or service being purchased. |
image_url | string | Image URL for the product. Must be an HTTPS URL. Recommended aspect ratio: 9:4. |
The example below creates a Checkout Session with a single line item:
Server
curl --request POST "https://api.fintoc.com/v2/checkout_sessions" \
  --header "Authorization: YOUR_TEST_SECRET_API_KEY" \
  --header "Content-Type: application/json" \
  --data-raw '{
    "amount": 350000,
    "currency": "CLP",
    "success_url": "https://merchant.com/success",
    "cancel_url": "https://merchant.com/cancel",
    "line_items": [
      {
        "quantity": 1,
        "price_data": {
          "currency": "CLP",
          "unit_amount": 350000,
          "product_data": {
            "name": "Annual subscription",
            "image_url": "https://merchant.com/images/annual-subscription.png"
          }
        }
      }
    ]
  }'
const { Fintoc } = require('fintoc');
const fintoc = new Fintoc('YOUR_TEST_SECRET_API_KEY');
const checkoutSession = await fintoc.checkoutSessions.create({
amount: 350000,
currency: 'CLP',
success_url: 'https://merchant.com/success',
cancel_url: 'https://merchant.com/cancel',
line_items: [
{
quantity: 1,
price_data: {
currency: 'CLP',
unit_amount: 350000,
product_data: {
name: 'Annual subscription',
image_url: 'https://merchant.com/images/annual-subscription.png'
}
}
}
]
});from fintoc import Fintoc
client = Fintoc('YOUR_TEST_SECRET_API_KEY')
checkout_session = client.checkout_sessions.create(
amount=350000,
currency='CLP',
success_url='https://merchant.com/success',
cancel_url='https://merchant.com/cancel',
line_items=[
{
'quantity': 1,
'price_data': {
'currency': 'CLP',
'unit_amount': 350000,
'product_data': {
'name': 'Annual subscription',
'image_url': 'https://merchant.com/images/annual-subscription.png'
}
}
}
]
)Fintoc responds with the created Checkout Session object, echoing the line_items you sent:
{
  "id": "cs_li5531onlFDi235",
  "object": "checkout_session",
  "mode": "test",
  "status": "created",
  "amount": 350000,
  "currency": "CLP",
  "created_at": "2024-06-04T15:32:46.721Z",
  "updated_at": "2024-06-04T15:32:46.721Z",
  "success_url": "https://merchant.com/success",
  "cancel_url": "https://merchant.com/cancel",
  "redirect_url": "https://pay.fintoc.com/checkout/cs_li5531onlFDi235",
  "metadata": {},
  "line_items": [
    {
      "quantity": 1,
      "price_data": {
        "currency": "CLP",
        "unit_amount": 350000,
        "product_data": {
          "name": "Annual subscription",
          "image_url": "https://merchant.com/images/annual-subscription.png"
        }
      }
    }
  ]
}
Pre-select a payment method (optional)
You can create a Checkout Session without specifying payment methods. In this case, customers can select from all available options on the Fintoc-hosted checkout page, based on the session parameters (amount, customer, currency) and the payment methods you have enabled in Fintoc.
Alternatively, you can explicitly define the payment method type(s) for the session. For example, the request below sets the bank_transfer method and uses payment_method_options to pre-select the institution cl_banco_estado for the customer. In this scenario, the payment flow presented to the customer is limited to this specific method and bank.
Server
curl --request POST "https://api.fintoc.com/v2/checkout_sessions" \
    --header "Authorization: YOUR_TEST_SECRET_API_KEY" \
    --header "Content-Type: application/json" \
    --data-raw '{
      "amount": 350000,
      "currency": "CLP",
      "success_url": "https://merchant.com/success",
      "cancel_url": "https://merchant.com/cancel",
      "payment_method_types": ["bank_transfer"],
      "payment_method_options": {
        "bank_transfer": {
          "sender_account": {
            "institution_id": {
              "value": "cl_banco_estado"
            }
          }
        }
      },
      "customer_data": {
        "tax_id": {
          "type": "cl_rut",
          "value": "11.111.111-1"
        },
        "name": "Felipe Castro",
        "email": "[email protected]",
        "metadata": {}
      }
    }'
const { Fintoc } = require('fintoc');
const fintoc = new Fintoc('YOUR_TEST_SECRET_API_KEY');
const checkoutSession = await fintoc.checkoutSessions.create({
amount: 350000,
currency: 'CLP',
success_url: 'https://merchant.com/success',
cancel_url: 'https://merchant.com/cancel',
payment_method_types: ['bank_transfer'],
payment_method_options: {
bank_transfer: {
sender_account: {
institution_id: {
value: 'cl_banco_estado'
}
}
}
},
customer_data: {
tax_id: {
type: 'cl_rut',
value: '11.111.111-1'
},
name: 'Felipe Castro',
email: '[email protected]',
metadata: {}
}
});from fintoc import Fintoc
client = Fintoc('YOUR_TEST_SECRET_API_KEY')
checkout_session = client.checkout_sessions.create(
amount=350000,
currency='CLP',
success_url='https://merchant.com/success',
cancel_url='https://merchant.com/cancel',
payment_method_types=['bank_transfer'],
payment_method_options={
'bank_transfer': {
'sender_account': {
'institution_id': {
'value': 'cl_banco_estado'
}
}
}
},
customer_data={
'tax_id': {
'type': 'cl_rut',
'value': '11.111.111-1'
},
'name': 'Felipe Castro',
'email': '[email protected]',
'metadata': {}
}
)| Attribute | Type | Description |
|---|---|---|
payment_method_types | array of strings | List of payment method types available for the session. One or more of bank_transfer, card. |
payment_method_options | object | Set of settings for each available payment method. |
Fintoc responds with the created Checkout Session object, echoing the pre-selected method and institution:
{
  "id": "cs_li5531onlFDi235",
  "object": "checkout_session",
  "mode": "test",
  "status": "created",
  "amount": 350000,
  "currency": "CLP",
  "created_at": "2024-06-04T15:32:46.721Z",
  "updated_at": "2024-06-04T15:32:46.721Z",
  "success_url": "https://merchant.com/success",
  "cancel_url": "https://merchant.com/cancel",
  "redirect_url": "https://pay.fintoc.com/checkout/cs_li5531onlFDi235",
  "metadata": {},
  "payment_method_types": [
    "bank_transfer"
  ],
  "payment_method_options": {
    "bank_transfer": {
      "sender_account": {
        "institution_id": {
          "value": "cl_banco_estado"
        }
      }
    }
  },
  "customer": {
    "id": "cus_3B2bODrQFje7ZVkT69xyaTSDwXQ",
    "object": "customer",
    "name": "Felipe Castro",
    "email": "[email protected]",
    "metadata": {},
    "tax_id": {
      "type": "cl_rut",
      "value": "11.111.111-1"
    }
  }
}
Left: Default view showing all available methods in Chile (bank transfer and cards) when no payment_method_types parameter is set. Center: Pre-selected bank_transfer flow for Banco Estado, displaying the institution-specific payment form directly. Right: Pre-selected card flow.
Using your own Checkout PageWhen you have your own checkout page, you should set the
payment_method_typesto redirect customers to the Fintoc-hosted checkout after they've already selected their preferred payment method.This skips Fintoc's payment method selection screen and directs customers straight to the specific payment flow, instead of letting Fintoc manage the full checkout experience.
Response when creating a Checkout Session
After you make the request to create the Checkout Session, Fintoc responds with the session object:
{
  "id": "cs_li5531onlFDi235",
  "object": "checkout_session",
  "mode": "test",
  "status": "created",
  "amount": 350000,
  "currency": "CLP",
  "created_at": "2024-06-04T15:32:46.721Z",
  "updated_at": "2024-06-04T15:32:46.721Z",
  "success_url": "https://merchant.com/success",
  "cancel_url": "https://merchant.com/cancel",
  "redirect_url": "https://pay.fintoc.com/checkout/cs_li5531onlFDi235",
  "metadata": {},
  "customer": {
    "id": "cus_3B2bODrQFje7ZVkT69xyaTSDwXQ",
    "object": "customer",
    "name": "Felipe Castro",
    "email": "[email protected]",
    "metadata": {},
    "tax_id": {
      "type": "cl_rut",
      "value": "11.111.111-1"
    }
  }
}
The response includes the redirect_url attribute. In the following step, you'll use this attribute to redirect the customer to complete the payment.
Redirect the customer to complete the payment
Next, redirect customers to the Fintoc-hosted checkout page. After they complete the payment, Fintoc automatically redirects them back to your site: to the success_url after a successful payment, or to the cancel_url if they cancel.
Client
window.location.assign(REDIRECT_URL_FROM_YOUR_BACKEND);Handle post-payment events
Once a Checkout Session finishes, you handle the payment result in your frontend and complete the payment in your backend. On your backend, use the events that Fintoc sends through webhooks.
Complete the payment on your backend
Fintoc sends a checkout_session.finished and a payment_intent.succeeded event when the session completes and the payment is successful. Follow the webhook guide to receive these events and run actions, such as sending an order confirmation email to your customer, logging the sale in a database, or starting a shipping workflow.
The checkout_session.finished event includes information about the session and the payment_intent:
{
  "id": "evt_a4xK32BanKWYn",
  "object": "event",
  "type": "checkout_session.finished",
  "data": {
    "id": "cs_li5531onlFDi235",
    "mode": "test",
    "amount": 350000,
    "object": "checkout_session",
    "status": "finished",
    "flow": "payment",
    "currency": "CLP",
    "metadata": {},
    "cancel_url": "https://merchant.com/cancel",
    "created_at": "2026-01-13T18:48:25Z",
    "expires_at": "2026-01-14T18:48:25Z",
    "success_url": "https://merchant.com/success",
    "redirect_url": "https://pay.fintoc.com/checkout/cs_li5531onlFDi235",
    "session_token": null,
    "customer_email": null,
    "customer": {
      "id": "cus_3B2bODrQFje7ZVkT69xyaTSDwXQ",
      "object": "customer",
      "name": "Felipe Castro",
      "email": "[email protected]",
      "metadata": {},
      "tax_id": {
        "type": "cl_rut",
        "value": "11.111.111-1"
      }
    },
    "payment_method_types": [
      "bank_transfer"
    ],
    "business_profile": {},
    "payment_resource": {
      "payment_intent": {
        "id": "pi_38DNJo3rbvGUzKFvCGZ6dxR1Kxx",
        "mode": "test",
        "amount": 350000,
        "object": "payment_intent",
        "status": "succeeded",
        "currency": "CLP",
        "metadata": {},
        "created_at": "2026-01-13T18:48:31Z",
        "expires_at": "2026-01-14T18:48:25Z",
        "error_reason": null,
        "payment_type": "bank_transfer",
        "reference_id": null,
        "widget_token": null,
        "customer_email": null,
        "sender_account": {
          "type": "checking_account",
          "number": "813990168",
          "holder_id": "11.111.111-1",
          "institution_id": "cl_banco_falabella"
        },
        "business_profile": {},
        "transaction_date": null,
        "recipient_account": null,
        "payment_type_options": {}
      }
    },
    "payment_method_options": {}
  }
}
Fintoc emits these events across the payment lifecycle, including the failure and pending paths. Handle each one:
| Event | Description | Action |
|---|---|---|
checkout_session.finished | Sent when a Checkout Session reaches a final state. The associated payment may still be pending, for example requires_action. | Complete the order based on the payment's status. |
checkout_session.expired | Sent when a Checkout Session expires. | Offer the customer another attempt to pay. |
payment_intent.succeeded | Sent when the payment related to a Checkout Session succeeds. | Confirm the customer's order. |
payment_intent.failed | Sent when the payment related to a Checkout Session fails. | Offer the customer another attempt to pay. |
payment_intent.requires_action | Sent when the payment related to a You receive this event when a | Inform your customer of the action needed to approve the payment, based on the next_action field in the webhook event. |
Handling async payments after theCheckout SessionendsIn some cases, the
Checkout Sessionmay finish with a payment that does not yet have a final status, such asrequires_action. This can happen, for example, when a bank transfer from a business account requires approval from more than one representative.In these cases, when you receive the
payment_intent.requires_actionevent, inform the customer that the payment is pending approval. Once you receive either thepayment_intent.succeededorpayment_intent.failedevent, you should notify the customer of the final payment status as soon as it is confirmed.
Test your integration
Using your test mode API Secret Key, you can create payments that simulate successful and failed outcomes without moving any money.
This lets you validate your full payment flow end-to-end:
- Your backend API requests (creating sessions and handling responses)
- The redirect flow from your frontend to the
redirect_urland back to thesuccess_urlorcancel_urlafter the payment - The webhooks for post-payment events
A successful test session reaches status finished and triggers the checkout_session.finished and payment_intent.succeeded webhooks; a failed one triggers payment_intent.failed. To trigger specific scenarios, use the test credentials and special test values described in our testing guide.