Integrate the Widget
Use the dashboard to connect your own acountWe recommend you integrate the Widget only if you want to connect your users' bank account. If you want to get data from your own bank account, you should connect your account using the Dashboard as its much easier.
If you want to get data from your users' financial institutions, there are three steps you need to follow:
- Open the widget on your frontend using your Public Key and a webhook URL
- Receive the
link_tokenin your webhook URL - From your backend, get the link bank movements or the fiscal invoices.
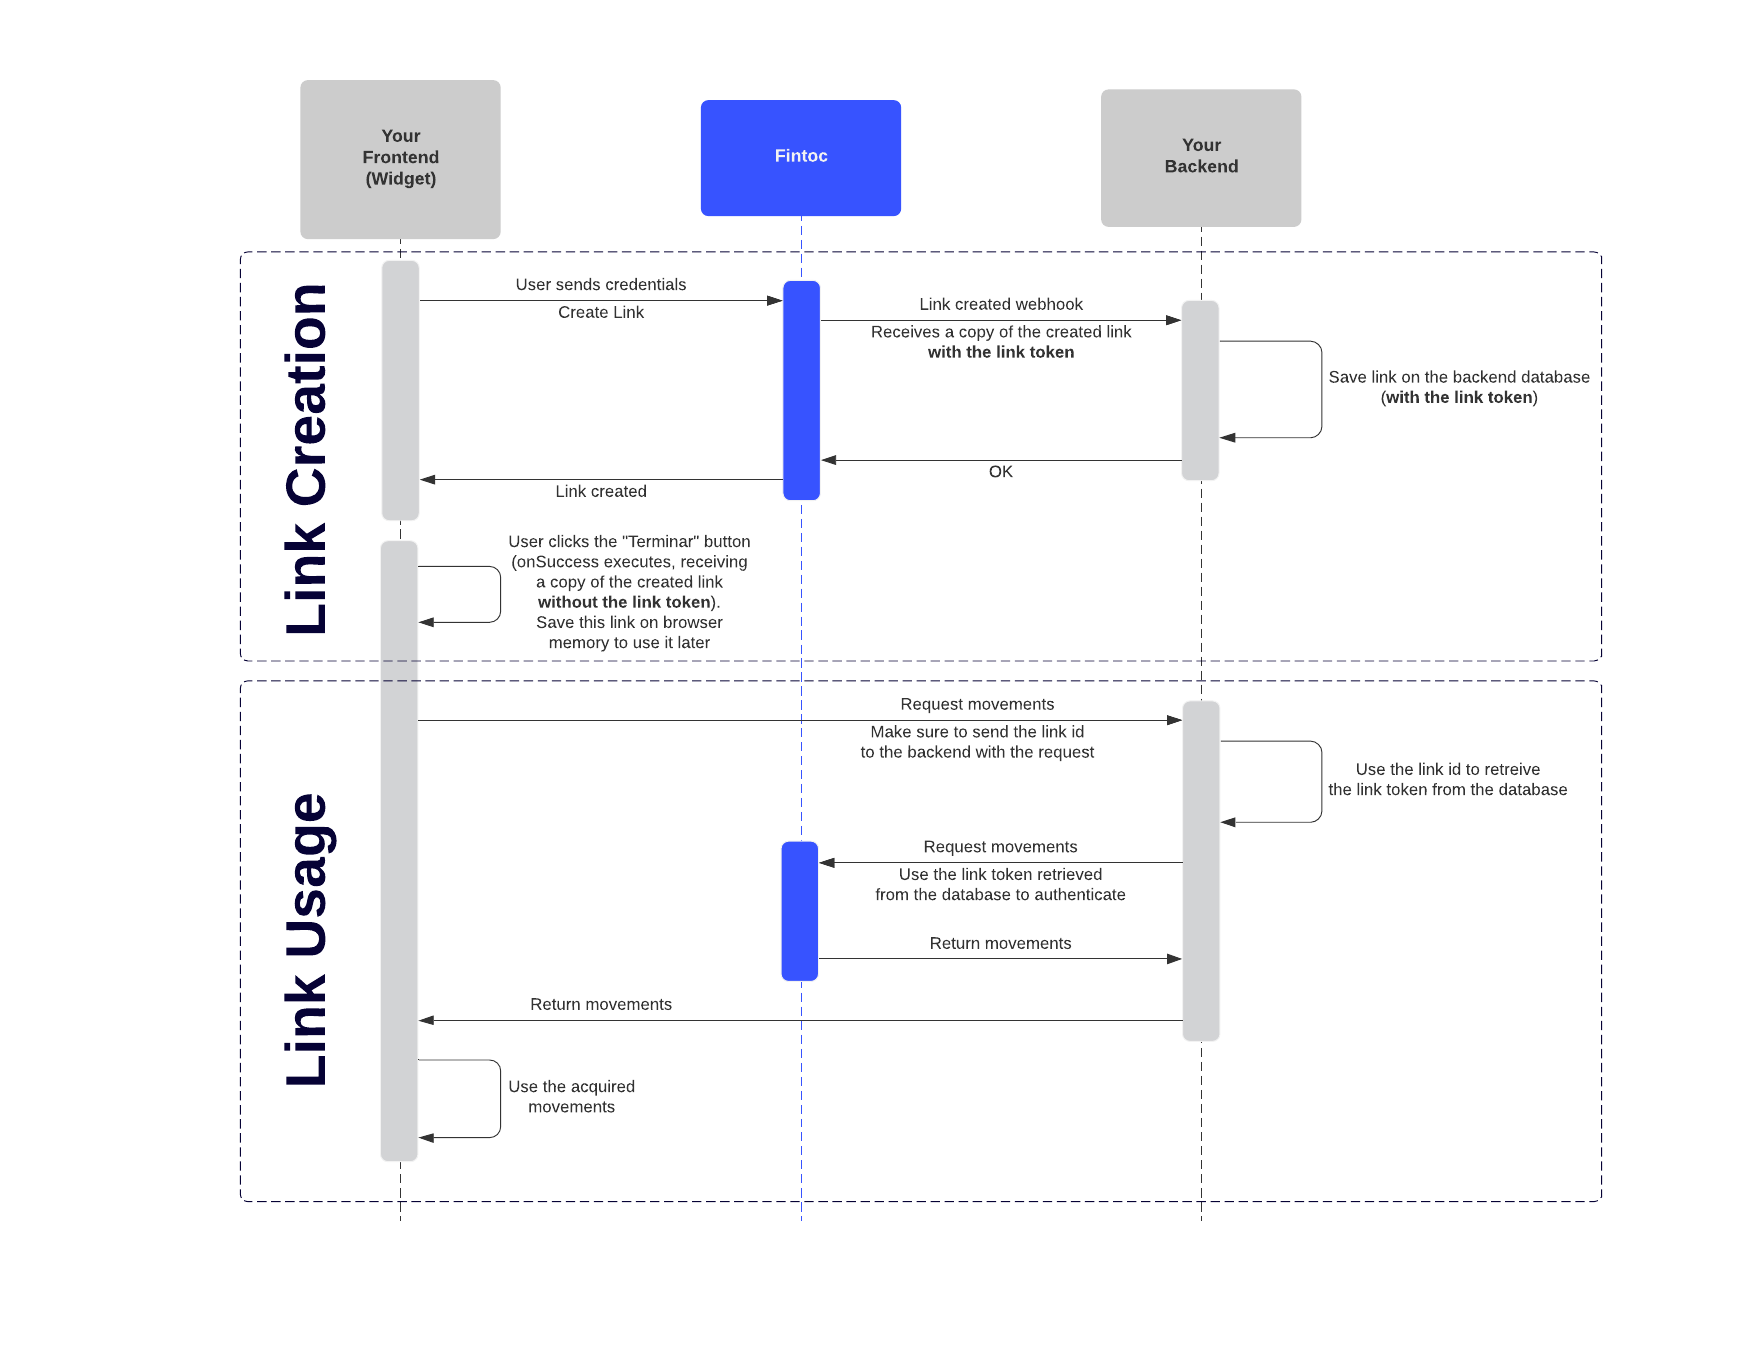
The following diagram shows how Fintoc interacts with both your backend and your frontend.
Before we can start using the widget, you need to get your Fintoc account's Public Key. It will be used throughout this guide, so make sure to follow the guide on how to get your API keys to get your live Public Key.
Open the Widget
To integrate the widget, you first need to load the widget script.
<script src="https://js.fintoc.com/v1/"></script>// Use the Load Script plugin
// https://github.com/tserkov/vue-plugin-load-script
async function loadFintoc() {
await Vue.loadScript('https://js.fintoc.com/v1/');
return window.Fintoc;
}
const Fintoc = await loadFintoc();// Use the React Script hook
// https://github.com/hupe1980/react-script-hook
function useFintoc() {
const [loading, error] = useScript({ src: 'https://js.fintoc.com/v1/' })
return [window.Fintoc || null, loading, error];
}
const [Fintoc, loading, error] = useFintoc();Now, you can use the Fintoc class to instantiate the widget!
TipBecause we will need to use our Public Key, some information needs to be replaced by you to make the code from this guide fully functional. From now on, we will write
FINTOC_PUBLIC_KEYto represent the Public Key that you need to replace.
<script>
  window.onload = () => {
    const widget = Fintoc.create({
      publicKey: 'FINTOC_PUBLIC_KEY',
      holderType: 'business',
      product: 'movements',
      webhookUrl: 'https://my-url.com/receive/webhook',
      onSuccess: (link) => {
        console.log('Success!');
        console.log(link);
      },
      onExit: () => {
        console.log('Widget closing!');
      },
      onEvent: (event) => {
        console.log('An event just happened!');
        console.log(event);
      },
    });
  };
</script>
const Fintoc = await loadFintoc();
const widget = Fintoc.create({
publicKey: 'FINTOC_PUBLIC_KEY',
holderType: 'individual',
product: 'movements',
webhookUrl: 'https://my-url.com/receive/webhook',
onSuccess: (link) => {
console.log('Success!');
console.log(link);
},
onExit: () => {
console.log('Widget closing!');
},
onEvent: (event) => {
console.log('An event just happened!');
console.log(event);
},
});const [Fintoc, loading, error] = useFintoc();
const widget = Fintoc.create({
publicKey: 'FINTOC_PUBLIC_KEY',
holderType: 'individual',
product: 'movements',
webhookUrl: 'https://my-url.com/receive/webhook',
onSuccess: (link) => {
console.log('Success!');
console.log(link);
},
onExit: () => {
console.log('Widget closing!');
},
onEvent: (event) => {
console.log('An event just happened!');
console.log(event);
},
});If you want to get the fiscal invoices, set the product to invoices.
Notice that the widget needs to receive the following configuration parameters:
publicKey: Your Fintoc Public Key, you can retrieve it following this guide.holderType: The type of account of the finantial entity to connect.product: The product that the created link will have access to.webhookUrl: The URL to send the complete Link information to (the Link passed to theonSuccessmethod is incomplete, as it does not include the Link Token, but the Link sent to thewebhookUrldoes include the Link Token). Note that this URL should be a URL of your backend.onSuccess: A function that executes upon completition of the frontend workflow for the creation of a Link.onExit: A function that executes when the widget gets closed (for any reason other than a page reload).onEvent: A function that executes when the widget triggers an event.
You can read more about these configuration parameters and their possible values on the official documentation.
We already loaded the script and instantiated the widget. Now, all that's left is to open it!
<script>
  widget.open();
</script>widget.open();widget.open();At this point, you should see the widget on your screen when loading the page:

Receive the link token
Whenever a user finishes the workflow for creating a Link, two things will happen:
- Fintoc will send a webhook to the
webhookUrlyou specified when instantiating theFintocobject. This webhook will contain all the information of the new Link. You should save this information to your database, as the Link Token will only be sent here, and you need to use that datum to query the Fintoc API. - The widget will execute the
onSuccessfunction, and will pass the new Link as a parameter. Notice that the Link passed to theonSuccessfunction does not contain the Link Token. You should probably store this new information on the browser memory, as the workflow for using the new Link involves sending the Link id to the backend, using that id to get the Link Token and using that token to query the Fintoc API, finally returning the data to the frontent.
A (very simplified) version of the complete workflow would look something like this:
Get the data
Get bank movements
To learn how to get your users' bank movements, follow this guide.
Updated 9 months ago